
Category: 代码

教程中使用的代码片段。

  • 怎么用免费的 Web3Form 给独立站加询盘表单?WordPress 和 Shopify 都能贴

    怎么用免费的 Web3Form 给独立站加询盘表单?WordPress 和 Shopify 都能贴

    独立站每个产品页、每个栏目都可能要一张询盘表。与其在每个页面单独接邮件,不如用一个后台把它们收拢。Web3Form 可以把表单提交发到你的邮箱,自带垃圾邮件防护;免费版每月可收 250 封。 代码复制后,WordPress 和 Shopify 都能贴。

    第 1 步:先弄清它能做什么(视频 00:24)

    Web3Form(官网写作 Web3Forms)的作用是:你在不同页面粘贴同一套表单代码,提交后统一进后台,并发送到你的邮箱。免费版带有自动防护;收费版防护会更强,还可以对接更多工具。对多数询盘量不大的站点,免费额度先够用。

    官网:https://web3forms.com(无联盟链接)

    第 2 步:注册并复制 Access Key(视频 03:20)

    1. 免费注册一个账号,在后台新建表单。
    2. 打开这个表单,复制 Access Key。这是你自己表单的钥匙,贴到网站代码里时要用你自己的,不要用别人页面或教程截图里的。
    3. 官方后台的 Implementation Examples 里也可以复制一份基础 HTML,默认字段一般是姓名、邮箱和留言。真正贴到网站上时,请用下一步这套已经改好的代码。
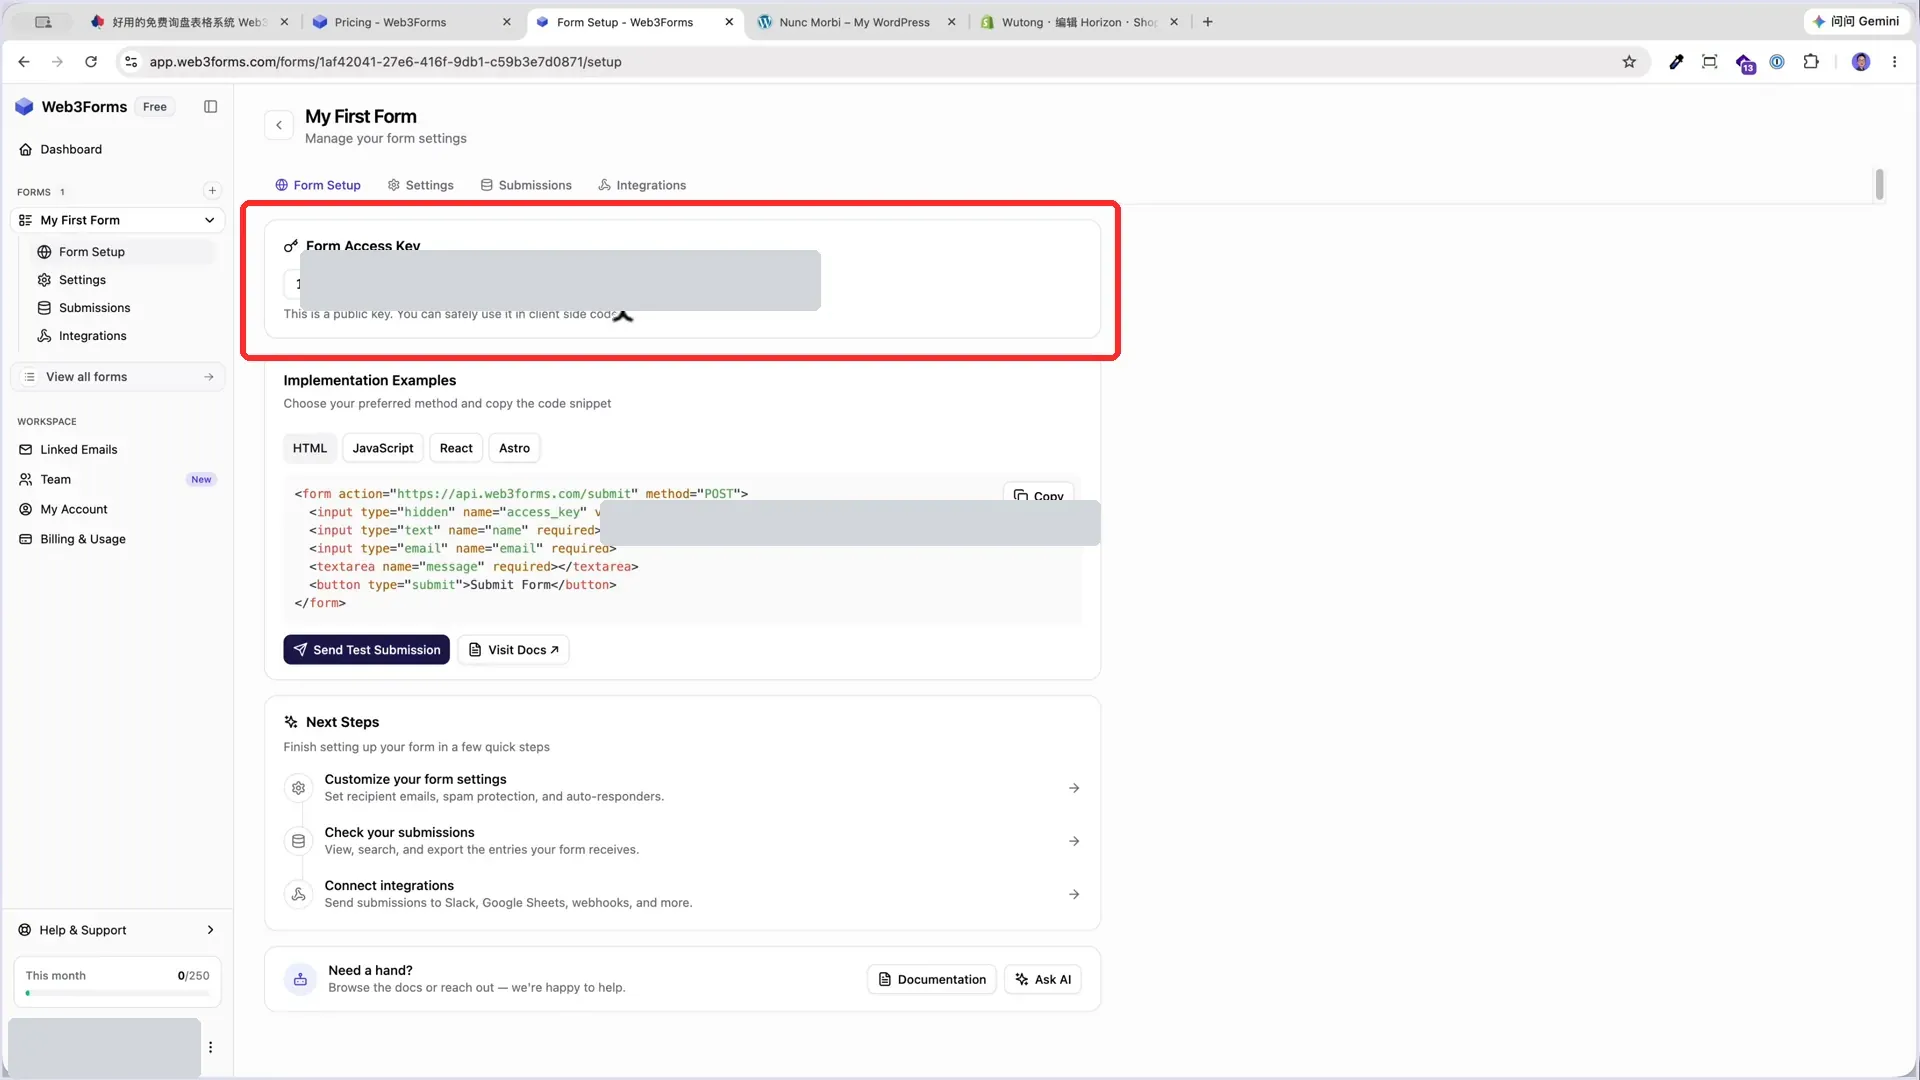
    Web3Form 后台复制表单 Access Key 的位置(Key 已打码)

    第 3 步:换成自己的 Key,并自动记下提交来源页(视频 06:16)

    下面这套代码来自现网 https://wutong.org/web3form/ 原文,可直接复制。它已经加上姓名、邮箱、留言字段,以及一个隐藏字段,用来自动记下客户是从哪个页面提交的。

    使用前只需做一件事:把 YOUR_ACCESS_KEY_HERE 换成你自己的 Access Key。用别人的 Key,邮件会寄到别人那里。字段和样式也可以把这段代码交给 AI,按你的需要改。

    <!-- Web3Forms Inquiry Form Block Start -->
    <div class="web3forms-inquiry-container" style="max-width: 500px; margin: 20px auto; padding: 25px; border: 1px solid #e0e0e0; border-radius: 8px; font-family: -apple-system, BlinkMacSystemFont, 'Segoe UI', Roboto, Helvetica, Arial, sans-serif; box-shadow: 0 4px 6px rgba(0,0,0,0.05);">
    
        <form action="https://web3forms.com" method="POST">
    
            <!-- ⚠️ 请把 VALUE 替换成你自己的 Web3Forms Access Key -->
            <input type="hidden" name="access_key" value="YOUR_ACCESS_KEY_HERE">
    
            <!-- Hidden Field: 自动搜集当前询盘来源网址 -->
            <input type="hidden" id="current-url" name="Inquiry Page URL" value="">
    
            <!-- Form Field: Full Name -->
            <div style="margin-bottom: 20px;">
                <label style="display: block; margin-bottom: 8px; font-weight: 600; color: #333;">Full Name *</label>
                <input type="text" name="Full Name" placeholder="Your full name" required style="width: 100%; padding: 10px; border: 1px solid #ccc; border-radius: 4px; box-sizing: border-box; font-size: 14px;">
            </div>
    
            <!-- Form Field: Email -->
            <div style="margin-bottom: 20px;">
                <label style="display: block; margin-bottom: 8px; font-weight: 600; color: #333;">Email Address *</label>
                <input type="email" name="Email" placeholder="your.email@example.com" required style="width: 100%; padding: 10px; border: 1px solid #ccc; border-radius: 4px; box-sizing: border-box; font-size: 14px;">
            </div>
    
            <!-- Form Field: Message -->
            <div style="margin-bottom: 20px;">
                <label style="display: block; margin-bottom: 8px; font-weight: 600; color: #333;">Message *</label>
                <textarea name="Message" rows="5" placeholder="Please describe your inquiry in detail..." required style="width: 100%; padding: 10px; border: 1px solid #ccc; border-radius: 4px; box-sizing: border-box; font-size: 14px; resize: vertical;"></textarea>
            </div>
    
            <!-- Submit Button -->
            <button type="submit" style="width: 100%; padding: 12px; background-color: #1a73e8; color: white; border: none; border-radius: 4px; font-size: 16px; font-weight: 600; cursor: pointer; transition: background-color 0.2s;">
                Submit Inquiry
            </button>
        </form>
    
        <!-- JS Script: 自动获取网址 -->
        <script>
          document.addEventListener("DOMContentLoaded", function() {
            document.getElementById("current-url").value = window.location.href;
          });
        </script>
    </div>
    <!-- Web3Forms Inquiry Form Block End -->
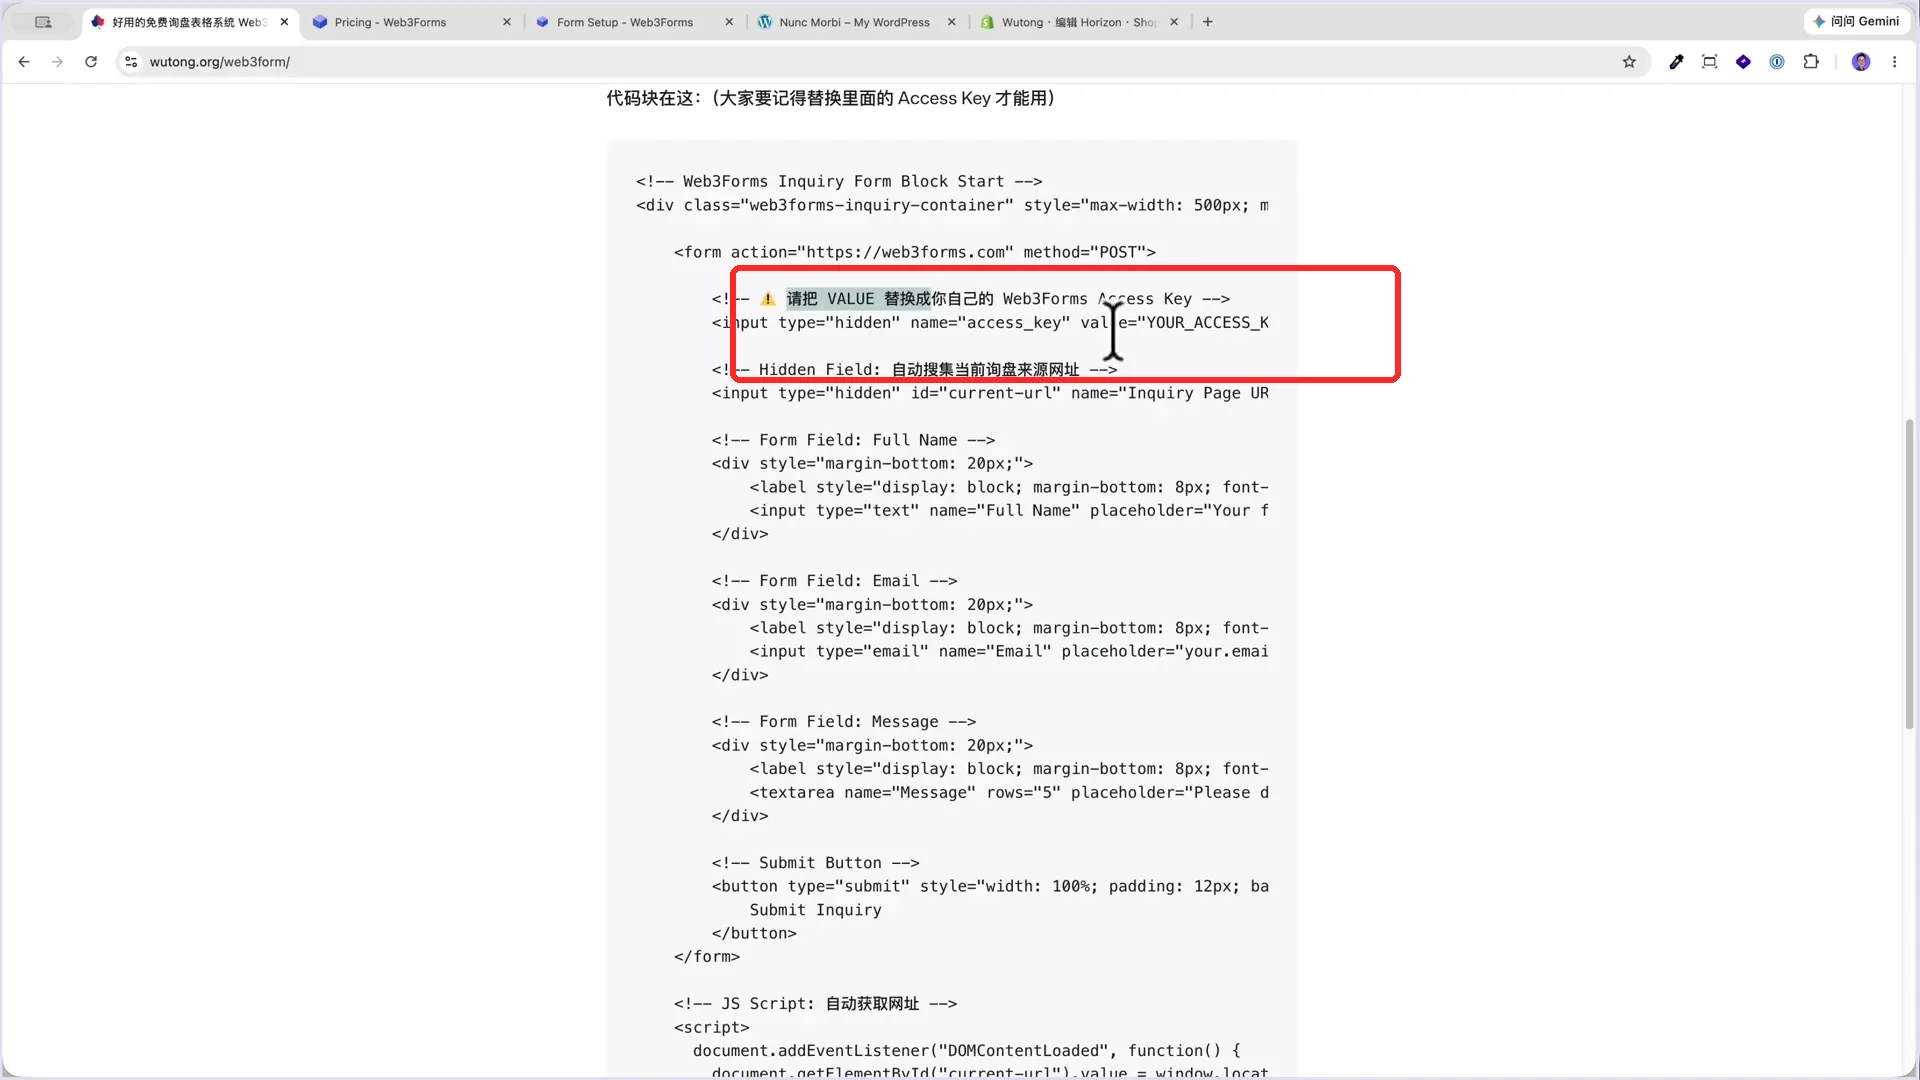
    示例代码中把 Access Key 替换成 YOUR_ACCESS_KEY_HERE 的位置

    第 4 步:在 Settings 里设收件邮箱、感谢页和防护(视频 07:29)

    到表单的 Settings 里可以设置:

    • 收件邮箱;
    • 邮件标题;
    • 客户提交后要跳转的感谢页网址;
    • 垃圾邮件防护(默认是开着的,建议保持开启)。

    第 5 步:在 WordPress 里用 Content Blocks 粘贴(视频 10:08)

    先把代码里的 Access Key 换成自己的,再复制整段。视频演示的是 Blocksy 的 Content Blocks:新建一个内容块,选择自定义 HTML,把改好的代码贴进去,保存后再把这个块插入到需要询盘的页面。预览里就能看到姓名、邮箱、留言和提交按钮。
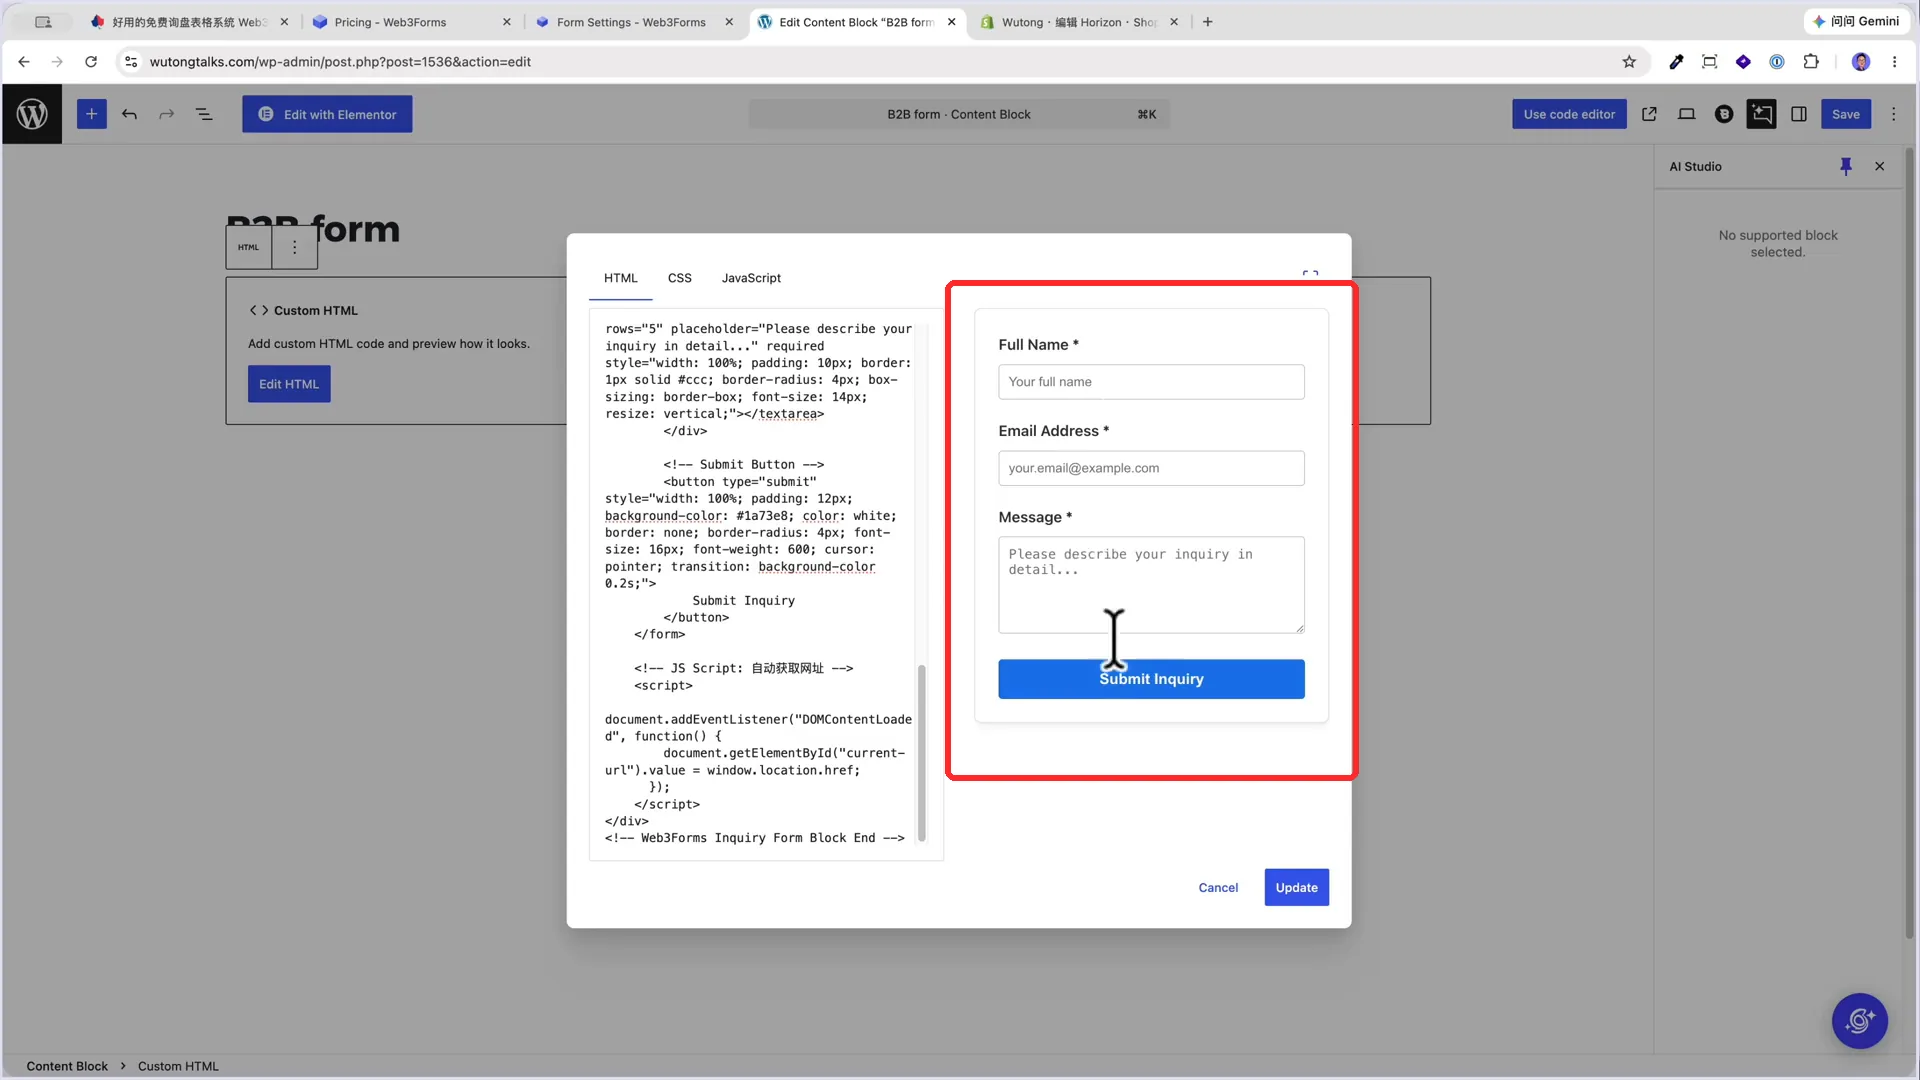
    在 WordPress Blocksy Content Blocks 的自定义 HTML 中预览询盘表单

    第 6 步:在 Shopify 产品页用自定义 Liquid 粘贴(视频 11:26)

    Shopify 后台同样简单。视频里的做法是:到产品页编辑,在合适的位置(例如分隔符下面)添加 自定义 Liquid,把同一段代码贴进去。提交后,来源网址同样会被记下。

    第 7 步:到 Submissions 查看记录;Pro 可对接表格(视频 12:54)

    回到 Web3Form 后台的 Submissions,可以看到每条提交的时间、字段,以及来源页面网址。免费版能查看最近一段时间的记录;需要更久的历史或导出,再考虑升级。

    Pro 还可以把提交自动写进 Notion 或 Google Sheet,按自己的工作流决定是否需要。
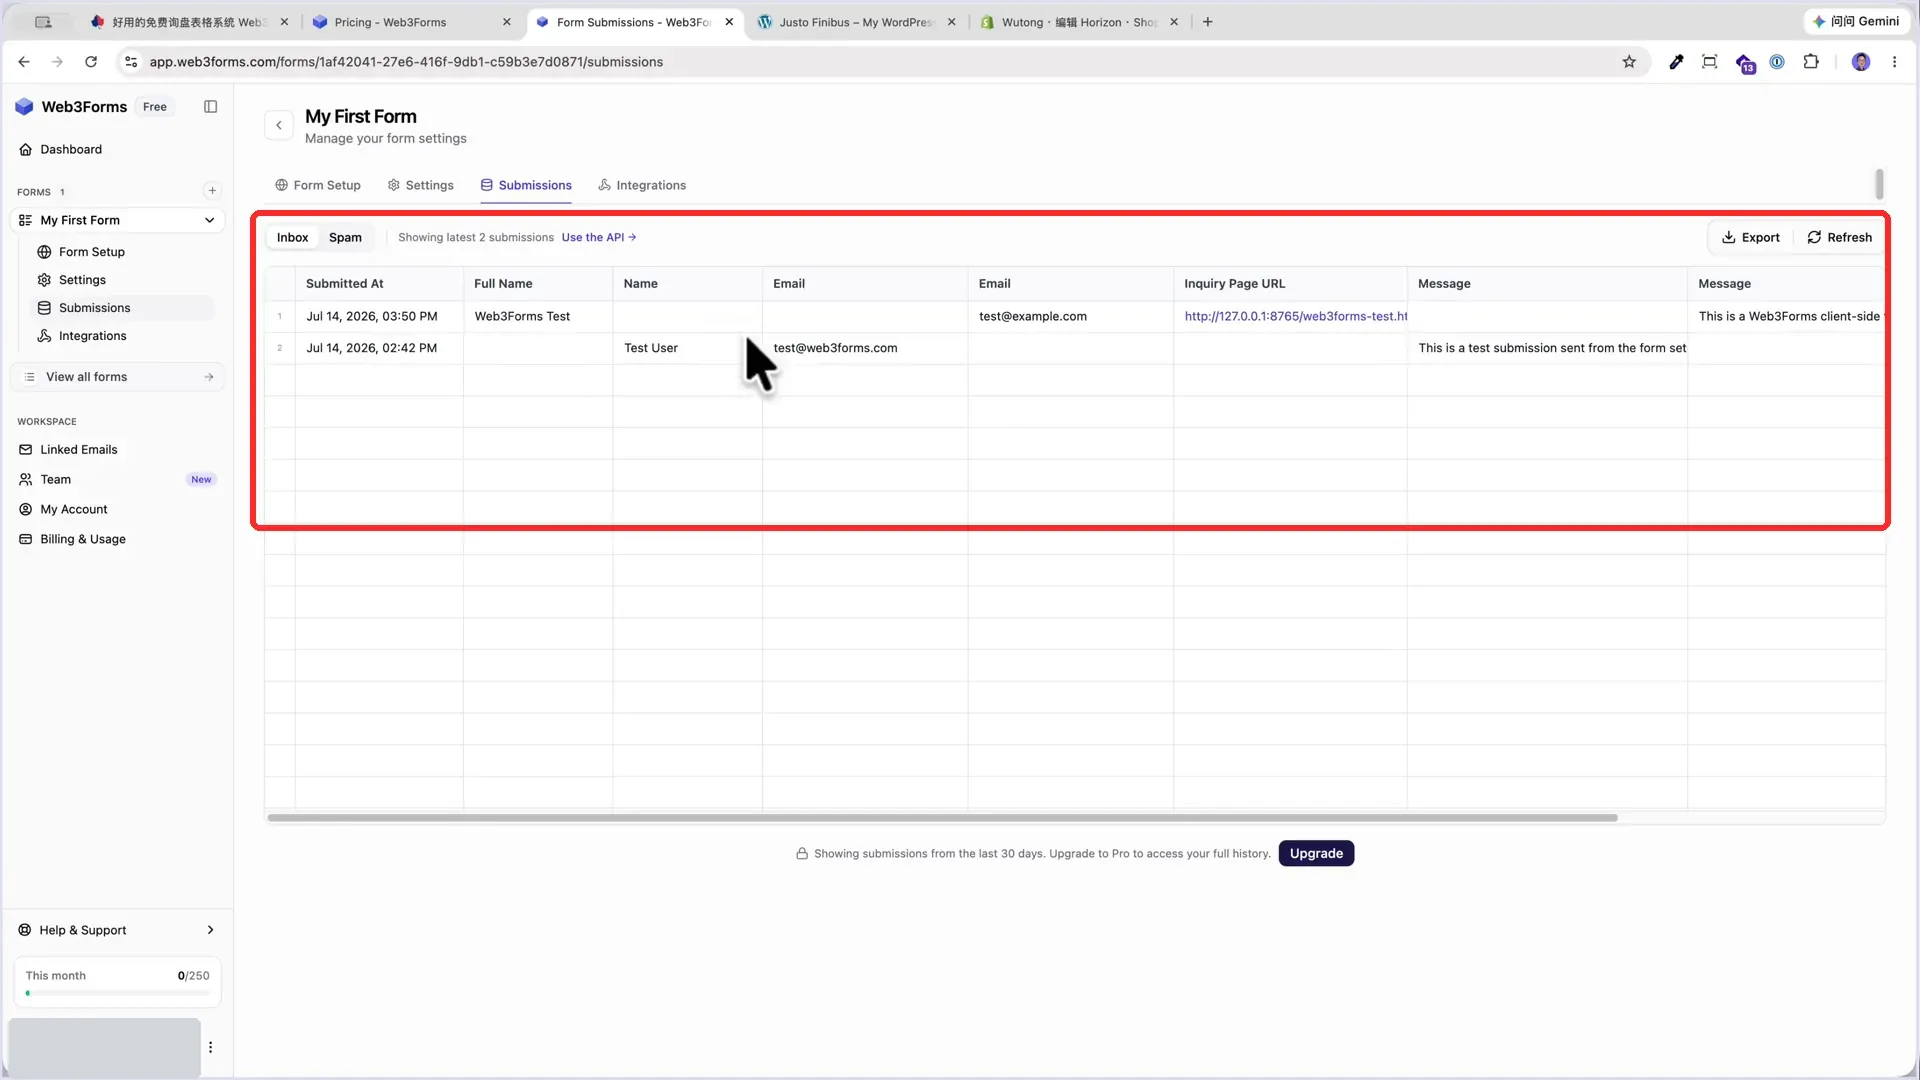
    Web3Form 的 Submissions 列表中显示 Inquiry Page URL 来源页

    常见问题

    • 免费版够用吗? 每月 250 封,对多数询盘站先够用。防护默认是开的,先用免费版即可。
    • 为什么一定要换成自己的 Key? 用别人的 Key,邮件会寄到别人那里。截图和旧文里的 Key 都不要直接复制。
    • 怎么知道客户是从哪个页面提交的? 上面代码里已经加了隐藏的来源网址字段,后台 Submissions 里就能看到。

    本页含联盟链接:仅在 WordPress 演示处使用 Blocksy。Web3Form 本身无联盟链接。

  • Shopify 制作B2B 询盘网站使用代码

    Shopify 制作B2B 询盘网站使用代码

    以下是我在视频如何用 Shopify 来制作 B2B 询盘网站|产品展示站教程中使用的代码。

    <div style="margin-top: 20px;">
      <!-- Enhanced Heading Section -->
      <h2 style="font-size: 24px; font-weight: 700; margin: 0 0 8px 0; line-height: 1.2;">Get Your Exclusive Quote</h2>
      <p style="font-size: 14px; color: #666; margin: 4px 0 20px 0; line-height: 1.5;">Tell us what you need — our team responds within 24 hours.</p>
      
      <!-- Trust Signals Bar -->
      <div style="display: flex; flex-wrap: wrap; gap: 20px; margin-bottom: 20px; font-size: 13px; color: #555;">
        <div style="display: flex; align-items: center; gap: 6px;"><span>✅</span><span>No commitment required</span></div>
        <div style="display: flex; align-items: center; gap: 6px;"><span>⚡</span><span>Fast response guaranteed</span></div>
        <div style="display: flex; align-items: center; gap: 6px;"><span>🔒</span><span>Your info stays private</span></div>
      </div>
    
      <!-- Success Message -->
      <div id="quote-success" style="display:none; background:#f0fff4; border:1px solid #68d391; border-radius:4px; padding:16px; margin-bottom:16px; color:#276749; font-size:14px;">
        ✅ Thank you for contacting us! We'll get back to you within 1 business day.
      </div>
      
      <!-- Quote Form -->
      <form id="quote-form" method="POST" action="/contact#contact_form">
        <input type="hidden" name="form_type" value="contact">
        <input type="hidden" name="utf8" value="✓">
        <input type="hidden" name="contact[product]" value="{{ product.title }}">
        <input type="hidden" name="contact[page_url]" value="{{ request.origin }}{{ request.path }}">
    
        <!-- ✅ Honeypot Field - 机器人陷阱,真实用户不可见 -->
        <div style="position: absolute; left: -9999px; top: -9999px; opacity: 0; height: 0; overflow: hidden;" aria-hidden="true">
          <label for="quote-website">Website (leave blank)</label>
          <input type="text" id="quote-website" name="contact[website]" tabindex="-1" autocomplete="off">
        </div>
    
        <div style="margin-bottom: 16px;">
          <label for="quote-name" style="display: block; font-weight: 500; margin-bottom: 6px; font-size: 14px;">Name</label>
          <input type="text" id="quote-name" name="contact[name]" required style="width: 100%; padding: 10px; border: 1px solid #ddd; border-radius: 4px; font-size: 14px; box-sizing: border-box;">
        </div>
        
        <div style="margin-bottom: 16px;">
          <label for="quote-email" style="display: block; font-weight: 500; margin-bottom: 6px; font-size: 14px;">Email</label>
          <input type="email" id="quote-email" name="contact[email]" required style="width: 100%; padding: 10px; border: 1px solid #ddd; border-radius: 4px; font-size: 14px; box-sizing: border-box;">
        </div>
        
        <div style="margin-bottom: 16px;">
          <label for="quote-message" style="display: block; font-weight: 500; margin-bottom: 6px; font-size: 14px;">Tell us about your needs</label>
          <textarea id="quote-message" name="contact[body]" rows="4" required style="width: 100%; padding: 10px; border: 1px solid #ddd; border-radius: 4px; font-size: 14px; box-sizing: border-box; font-family: inherit;"></textarea>
        </div>
        
        <button type="submit" style="width: 100%; padding: 12px; background-color: #000; color: #fff; border: none; border-radius: 4px; font-size: 14px; font-weight: 600; cursor: pointer; margin-bottom: 10px;">Request My Quote →</button>
        <p style="font-size: 12px; color: #888; text-align: center; margin: 10px 0 0 0;">We'll get back to you within 1 business day.</p>
      </form>
    </div>
    
    <script>
    document.getElementById('quote-form').addEventListener('submit', function(e) {
      e.preventDefault();
      var form = this;
    
      // ✅ Honeypot 检测:如果隐藏字段有值,判定为机器人,静默拒绝
      var honeypot = document.getElementById('quote-website').value;
      if (honeypot !== '') {
        form.style.display = 'none';
        document.getElementById('quote-success').style.display = 'block';
        return; // 假装成功,实际不提交
      }
    
      var data = new FormData(form);
      fetch('/contact', {
        method: 'POST',
        headers: { 'Accept': 'application/json' },
        body: data
      }).then(function() {
        form.style.display = 'none';
        document.getElementById('quote-success').style.display = 'block';
      });
    });
    </script>
    

  • WooCommerce 隐藏价格和加入购物车按钮代码(询盘站可直接复制)

    WooCommerce 隐藏价格和加入购物车按钮代码(询盘站可直接复制)

    大家可以利用这段代码,来隐藏Woocommerce商城中的加入购物车功能和实现隐藏价格标签的功能。

    大家可以利用这段代码,来隐藏Woocommerce商城中的加入购物车功能和实现隐藏价格标签的功能,对建立产品网站特别实用。具体用法请看相关的视频讲解。这个办法不会随着WordPress的更新而消失,一劳永逸。

    视频链接如下:

    请复制下面的代码即可:

    add_filter( 'woocommerce_is_purchasable', '__return_false');
    remove_action( 'woocommerce_single_product_summary', 'woocommerce_template_single_add_to_cart', 30 );

    // 如果你不想要显示提示信息,请把这一段删除即可
    add_action( 'woocommerce_single_product_summary', 'optional_message', 20 );
    function optional_message() {
    echo '<p class="woocommerce-message">请点击下方按钮与我们联系。</p>';
    }

    // 隐藏商品价格,如果不想隐藏价格,请把这一段删除即可
    add_filter( 'woocommerce_get_price_html', 'woocommerce_remove_price');
    function woocommerce_remove_price($price){
    return ;
    }

    在最新视频(如何设计B2B询盘网站)中,使用的另一段代码

    // 如果你不想要显示提示信息,请把这一段删除即可
    add_action( 'woocommerce_single_product_summary', 'optional_message', 20 );
    function optional_message() {
       echo '<a href="mailto:abc@abc.com">点此联系我们</a>';
    }
  • Shopify B2C 询盘站代码:联系表单和询价按钮,直接复制

    Shopify B2C 询盘站代码:联系表单和询价按钮,直接复制

    这篇文章包含了视频教程:如何使用Shopify设计产品展示站教程中提及的代码,请大家参考。如果有任何问题,欢迎大家留言。

    {{ 'section-contact-form.css' | asset_url | stylesheet_tag }}
    
    {%- style -%}
      .section-{{ section.id }}-padding {
        padding-top: {{ section.settings.padding_top | times: 0.75 | round: 0 }}px;
        padding-bottom: {{ section.settings.padding_bottom | times: 0.75 | round: 0 }}px;
      }
    
      @media screen and (min-width: 750px) {
        .section-{{ section.id }}-padding {
          padding-top: {{ section.settings.padding_top }}px;
          padding-bottom: {{ section.settings.padding_bottom }}px;
        }
      }
    {%- endstyle -%}
    
    <div class="color-{{ section.settings.color_scheme }} gradient">
      <div class="contact page-width page-width--narrow section-{{ section.id }}-padding">
        {%- if section.settings.heading != blank -%}
          <h2 class="title title-wrapper--no-top-margin {{ section.settings.heading_size }}">{{ section.settings.heading | escape }}</h2>
        {%- else -%}
          <h2 class="visually-hidden">{{ 'templates.contact.form.title' | t }}</h2>
        {%- endif -%}
        {%- form 'contact', id: 'ContactForm', class: 'isolate' -%}
          {%- if form.posted_successfully? -%}
            <div class="form-status form-status-list form__message" tabindex="-1" autofocus>{% render 'icon-success' %} {{ 'templates.contact.form.post_success' | t }}</div>
          {%- elsif form.errors -%}
            <div class="form__message">
              <h2 class="form-status caption-large text-body" role="alert" tabindex="-1" autofocus>{% render 'icon-error' %} {{ 'templates.contact.form.error_heading' | t }}</h2>
            </div>
            <ul class="form-status-list caption-large" role="list">
              <li>
                <a href="#ContactForm-email" class="link">
                  {{ form.errors.translated_fields['email'] | capitalize }} {{ form.errors.messages['email'] }}
                </a>
              </li>
            </ul>
          {%- endif -%}
          <div class="contact__fields">
            <div class="field">
              <input class="field__input" autocomplete="name" type="text" id="ContactForm-name" name="contact[{{ 'templates.contact.form.name' | t }}]" value="{% if form.name %}{{ form.name }}{% elsif customer %}{{ customer.name }}{% endif %}" placeholder="{{ 'templates.contact.form.name' | t }}">
              <label class="field__label" for="ContactForm-name">{{ 'templates.contact.form.name' | t }}</label>
            </div>
            <div class="field field--with-error">
              <input
                autocomplete="email"
                type="email"
                id="ContactForm-email"
                class="field__input"
                name="contact[email]"
                spellcheck="false"
                autocapitalize="off"
                value="{% if form.email %}{{ form.email }}{% elsif customer %}{{ customer.email }}{% endif %}"
                aria-required="true"
                {% if form.errors contains 'email' %}
                  aria-invalid="true"
                  aria-describedby="ContactForm-email-error"
                {% endif %}
                placeholder="{{ 'templates.contact.form.email' | t }}"
              >
              <label class="field__label" for="ContactForm-email">{{ 'templates.contact.form.email' | t }} <span aria-hidden="true">*</span></label>
              {%- if form.errors contains 'email' -%}
                <small class="contact__field-error" id="ContactForm-email-error">
                  <span class="visually-hidden">{{ 'accessibility.error' | t }}</span>
                  <span class="form__message">{% render 'icon-error' %}{{ form.errors.translated_fields['email'] | capitalize }} {{ form.errors.messages['email'] }}</span>
                </small>
              {%- endif -%}
            </div>
          </div>
          <div class="field">
            <textarea
              rows="10"
              id="ContactForm-body"
              class="text-area field__input"
              name="contact[{{ 'templates.contact.form.comment' | t }}]"
              placeholder="{{ 'templates.contact.form.comment' | t }}"
            >
              {{- form.body -}}
            </textarea>
            <label class="form__label field__label" for="ContactForm-body">{{ 'templates.contact.form.comment' | t }}</label>
            {% if product.url %}
    <input type="hidden" id="ContactForm-product" name="contact[Product-name]" value="{{ product.title }}" />
    {% endif %}
            {% if product.url %}
    <input type="hidden" id="ContactForm-product" name="contact[Product-Link]" value="{{ product.url }}" />
    {% endif %}
          </div>
          <div class="contact__button">
            <button type="submit" class="button">
              {{ 'templates.contact.form.send' | t }}
            </button>
          </div>
        {%- endform -%}
      </div>
    </div>

    以下是Convertbox,嵌套在Shopify产品页面中的代码

    <a href='#cbbf0c746'>
    <button class="button-quote">
    Ask for Quote
    </button>
    </a>
    <style>
    .button-quote {
      background-color: black;
      border:none;
      color:white;
      font-size: 16px;
      padding: 15px 32px;
      margin: 10px 0px;
      cursor: pointer;
    }
    </style>